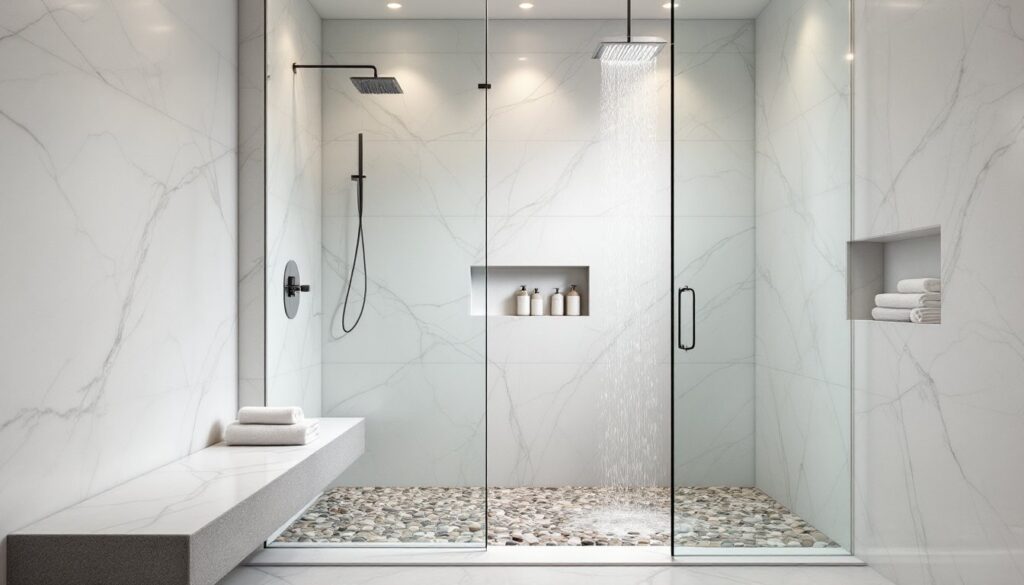
A walk-in stone shower transforms a daily routine into a spa-like experience, bringing raw natural beauty into the bathroom. Unlike standard tile or acrylic enclosures, stone showers offer unique textures, color variations, and durability that can last decades when properly installed. The barrier-free design eliminates curbs and doors, creating seamless accessibility and a modern aesthetic. With natural stone options ranging from classic marble to rugged slate, homeowners can customize the look to match any design vision, but the material choice, installation quality, and ongoing care determine whether the investment pays off or becomes a maintenance headache.
Table of Contents
ToggleKey Takeaways
- A walk-in stone shower combines durable natural stone surfaces with curbless, barrier-free design that meets ADA accessibility standards while creating a spa-like aesthetic that can increase home value by 60–70% at resale.
- Natural stone options like granite and slate offer superior durability and slip resistance compared to ceramic tile, though marble requires sealing every 6–12 months and softer stones like limestone need rigorous maintenance to prevent water damage.
- Proper waterproofing, consistent ¼-inch-per-foot floor slope toward a linear drain, and high-quality thinset mortar are critical installation requirements that prevent costly mold and structural damage—professional installation typically ranges from $3,500–$8,000.
- Design flexibility with walk-in stone showers allows mixing stone types, sizes, and finishes, while epoxy grout and darker stone colors reduce long-term maintenance compared to traditional cement grout and light-colored materials.
- Walk-in stone showers require ongoing care including weekly pH-neutral cleaning, monthly grout inspection, and regular sealing schedules (every 1–2 years for granite and slate), making professional installation and certified tile installers a worthwhile investment to avoid subfloor water damage.
What Is a Walk-In Stone Shower?
A walk-in stone shower features natural or engineered stone surfaces with a curbless or low-profile entry that requires no door or threshold to step over. The defining characteristic is the barrier-free access, water drains through a linear drain or recessed pan, and the floor slopes gently (typically ¼ inch per foot) toward the drain to prevent pooling.
The stone can cover walls, floors, or both. Common formats include large-format slabs, stacked ledger panels, river rock mosaics, or traditional tile cut from natural stone. Unlike ceramic or porcelain tile that mimics stone, a natural stone walk in shower uses actual quarried material like marble, granite, travertine, or slate, each with inherent color variation and veining that makes every installation one-of-a-kind.
Curbless designs meet ADA accessibility standards when built correctly, making them ideal for aging-in-place renovations. But, the absence of a curb means the bathroom floor outside the shower must be waterproofed and sloped carefully to prevent water migration, a detail often overlooked in DIY projects. Most jurisdictions require a waterproof membrane (like Schluter-Kerdi or RedGard) under the stone, and some inspectors mandate a mortar bed for proper drainage slope, especially on concrete subfloors.
Benefits of Installing a Walk-In Stone Shower
Durability and longevity top the list. Natural stone, when sealed and maintained, resists wear better than most man-made surfaces. Granite and slate can handle decades of daily use without cracking or fading, unlike acrylic that yellows or fiberglass that flexes and cracks.
Aesthetic appeal is unmatched. Each slab has unique mineral patterns, and the tactile quality of natural stone, cool underfoot, textured to the touch, adds sensory richness. Designers favor stone for high-end builds because it conveys permanence and craftsmanship.
Accessibility and safety improve with curbless entry. Eliminating the threshold reduces trip hazards for children, elderly users, and anyone with mobility challenges. Textured stone like honed granite or pebble mosaics provides slip resistance when wet, a critical safety feature standard smooth tile can’t match without added treatments.
Increased home value follows quality installations. Appraisers and buyers recognize stone showers as premium upgrades. A well-executed walk-in stone shower can return 60–70% of its cost at resale in many markets, particularly in bathrooms serving master suites.
Customization flexibility lets homeowners mix stone types, sizes, and finishes. Combining a river rock floor with stacked slate walls or marble accent strips creates visual interest without relying on grout lines alone. This design freedom exceeds what’s practical with prefab shower kits.
Popular Stone Types for Walk-In Showers
Natural Stone Options
Marble remains the classic choice for luxury showers. Carrara, Calacatta, and Statuario varieties feature white or gray backgrounds with dramatic veining. Marble is softer than granite (Mohs hardness 3–4), so it scratches more easily and requires sealing every 6–12 months with a penetrating sealer like StoneTech BulletProof or Aqua Mix Sealer’s Choice Gold. Polished marble is slippery when wet: honed or tumbled finishes provide better traction.
Granite offers superior hardness (Mohs 6–7) and lower porosity, making it ideal for high-traffic shower floors. It accepts a variety of finishes, polished, honed, flamed, or leathered, each affecting slip resistance differently. Darker granites hide soap scum and water spots better than light colors.
Travertine brings warm earth tones and natural pitting that creates texture. The stone is porous and must be filled and sealed before installation to prevent mold growth in the voids. Unfilled travertine is not recommended for shower floors due to water retention issues.
Slate provides excellent slip resistance in its natural cleft (rough) finish. It’s durable, stain-resistant when sealed, and available in grays, greens, purples, and blacks. Slate’s layered structure can sometimes flake if improper fasteners are used during installation, so thinset selection matters.
Limestone and sandstone are softer and more porous, requiring rigorous sealing and not recommended for shower floors subject to standing water. Walls can work if properly maintained, but harder stones are safer long-term choices.
Engineered and Alternative Stone Materials
Quartz slabs (like Caesarstone or Silestone) combine 90–95% natural quartz with polymer resins. They’re non-porous, never need sealing, and resist staining better than natural stone. Large-format slabs minimize grout joints, reducing mold risk. But, quartz is more expensive per square foot than many natural stones and can’t handle heat above 300°F, though that’s irrelevant in showers.
Porcelain pavers manufactured to mimic natural stone offer a budget-friendly alternative. Modern inkjet printing creates realistic veining, and through-body porcelain won’t show chips. They’re easier to cut and install than real stone, but lack the thermal mass and authentic texture.
Pebble and river rock mosaics use small natural stones mounted on mesh backing. They excel on shower floors, conforming to slopes and providing superior grip. Installation is labor-intensive, each pebble must be set level, and grout joints require sealing to prevent mildew. Brands like Solistone and Emser Tile offer pre-sorted, calibrated pebbles that simplify installation.
Design Ideas and Layout Considerations
Linear drains have replaced traditional center drains in most modern walk-in designs. Positioned against one wall, they allow a single-direction floor slope and make large-format stone installation cleaner. Schluter-Kerdi-Line and Infinity Drain are common spec-grade options.
Niche and bench placement should be planned during framing. A 12″ × 24″ recessed niche between studs holds toiletries without protruding into the shower space. Built-in benches need blocking between studs to support weight, plan for 16″ depth minimum and waterproof the top with the same membrane as walls and floor.
Mixing stone types adds visual interest but requires planning to keep grout lines aligned. A common approach: use 12″ × 24″ marble slabs on walls, 2″ hexagonal marble tile on vertical accent strips, and river rock on the floor. Keeping the same stone color family unifies the look.
Lighting affects how stone appears. Warm LED strips (2700–3000K) enhance travertine and beige marble: cooler temps (4000K) bring out details in gray granite and slate. Recessed ceiling lights should be IC-rated and wet-location listed per NEC 410.10(D).
Glass enclosures vs. open layouts depend on space. A frameless glass panel on one side contains splash without closing off the shower visually. Fully open designs need at least 36″ × 36″ of shower space and a wider waterproofed area extending 24–36″ beyond the shower footprint to handle water migration.
Grout color and joint width impact maintenance. 1/16″ or 1/8″ joints with epoxy grout (like Laticrete SpectraLOCK) resist staining and mildew better than sanded cement grout. Matching grout color to stone hides imperfections: contrasting grout highlights the pattern, a design choice with practical trade-offs.
Installation and Maintenance Requirements
Installation complexity exceeds standard tile work. Stone’s weight requires a solid substrate, ¾” exterior-grade plywood over joists spaced 16″ on center minimum, or a mortar bed over concrete. Deflection can crack stone and grout, so if the floor feels bouncy, add blocking or sister joists before starting.
Waterproofing can’t be skipped. Apply a sheet membrane (Schluter-Kerdi, Laticrete Hydro Ban Sheet) or liquid membrane (RedGard, Aqua Defense) to walls and floor, overlapping seams per manufacturer specs. Most codes require waterproofing to extend 6 inches beyond the shower footprint.
Thinset selection matters, use a large-and-heavy-tile mortar (Laticrete 257, Mapei Ultraflex LFT) for anything larger than 8″ × 8″ or for stone heavier than ceramic. White thinset prevents dark shadowing through light marble: gray works for darker stones. Back-buttering large slabs ensures full coverage and prevents voids that lead to cracking.
Slope must be consistent. The floor should drop ¼” per foot toward the drain. Use a self-leveling compound or build a mortar bed to create the slope before setting stone. A digital level or laser helps verify accuracy, even a few degrees off creates standing water.
Sealing schedules vary by stone. Granite and slate: every 1–2 years. Marble and travertine: every 6–12 months. Unsealed stone absorbs soap, shampoo, and hard water minerals, leading to discoloration and etching. Use a penetrating sealer, not a topical coating that can peel or yellow.
Routine maintenance includes daily squeegee use to prevent water spots, weekly cleaning with pH-neutral stone cleaner (never vinegar or acidic products on marble or travertine), and monthly grout inspection. Epoxy grout reduces this burden significantly compared to traditional cement grout.
Professional help is often worth the cost. Installing a curbless shower with proper waterproofing, slope, and stone setting typically runs $3,500–$8,000 depending on size, stone choice, and regional labor rates. DIYers can handle simple stone wall installations over existing curbed pans, but curbless systems with mortar beds and drainage integration often require a licensed contractor to meet code and avoid costly water damage down the line. Most jurisdictions require a plumbing permit for drain relocation and a building permit for structural changes, check local requirements before demolition begins.
If water leaks into the subfloor, mold remediation and structural repairs can exceed the original shower cost. Hiring a certified tile installer (CTI) or contractor experienced in barrier-free showers reduces that risk. When choosing a pro, ask for photos of completed stone showers, verify waterproofing methods, and confirm they’ll pull necessary permits.